Backup, Migration and Staging in WordPress with WPVivid
Moving a WordPress site from a local development environment to a live server used to involve a lot of manual work. Exporting databases, copying files over FTP, adjusting URLs inside the database, and checking for broken image paths was part of the process for years.
For smaller sites that is mostly annoying. For larger projects it can easily become risky.
WPvivid is one of the plugins that simplifies this workflow significantly. It combines backup, migration and staging tools in a single interface and is aimed at users who do not want to manage database replacements or server-side scripts manually.
If you regularly work on local WordPress installations, staging environments, or client projects, it can save a considerable amount of time.

What the Plugin Does
The main purpose of WPvivid is straightforward:
- Create backups of your WordPress site
- Migrate sites between servers
- Create staging environments safely
The migration feature is especially useful when moving a local site to production. Instead of exporting a database manually and running search-and-replace operations on URLs, the plugin handles these adjustments automatically during the migration process.
That includes:
- Internal URLs
- Media references
- Serialized WordPress data
- Database tables
- Theme and plugin files
For beginners, that removes one of the more fragile parts of a WordPress deployment workflow.
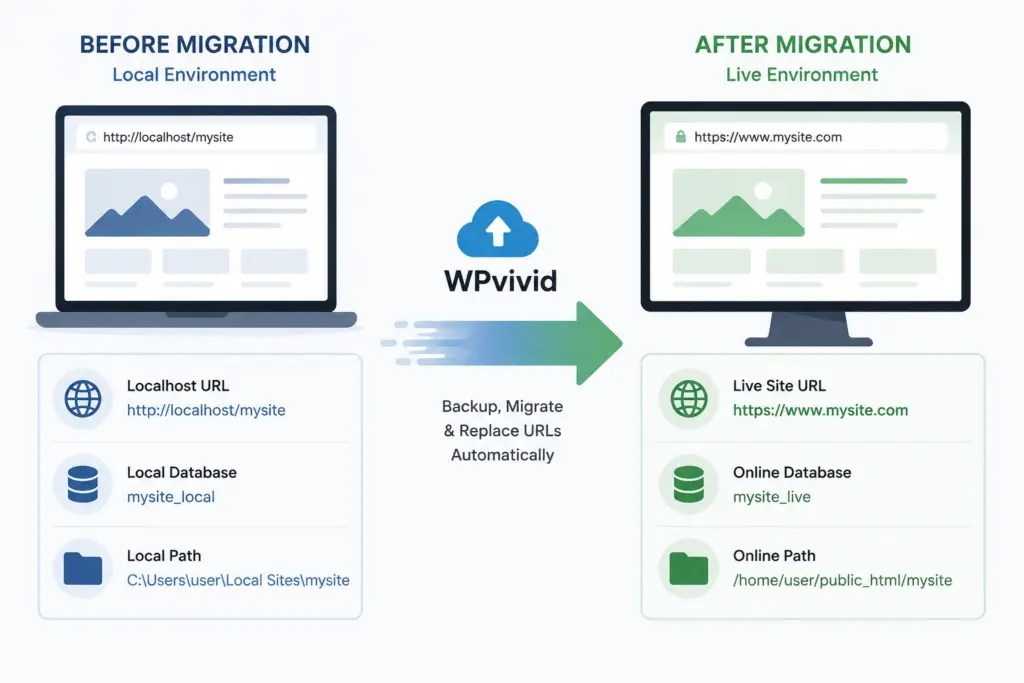
Typical Use Case: Local Development to Live Server
A common scenario looks like this:
You build a site locally using LocalWP, XAMPP or Docker. The site uses URLs like:
http://myproject.localOnce the project is ready, you want to move it to:
https://example.comWithout a migration tool, you usually need to:
- Export the database
- Upload all files manually
- Import the database
- Run URL replacements
- Fix broken serialized data if necessary
- Verify uploads and media paths
WPvivid automates most of this. The plugin packages the site, transfers the data and updates references during the process.
That reduces the chances of broken links or missing media files after deployment.
Installation and Initial Setup
Installing the plugin is standard WordPress procedure.
Install from the WordPress Repository
Inside the WordPress admin area:
- Go to Plugins > Add New
- Search for WPvivid Backup Plugin
- Install and activate the plugin
After activation, a new WPvivid section appears in the admin menu.
The interface is relatively clean compared to many backup plugins. Most important actions are accessible directly from the main dashboard.
Creating Your First Backup
To create a manual backup:
- Open the WPvivid dashboard
- Choose whether you want to back up:
- Files only
- Database only
- Entire site
- Start the backup process
The plugin creates an archive that can later be restored or migrated to another server.
For smaller shared hosting environments, it is worth checking available PHP memory limits and execution time settings. Large media libraries can increase backup duration significantly.
Migrating a WordPress Site
The migration workflow is where the plugin becomes especially practical for non-technical users.
Example: Moving a Local Site Online
Let’s assume you finished building a WooCommerce site locally and want to move it to a production server.
The basic process is:
- Install WordPress on the destination server
- Install WPvivid on both sites
- Generate a migration key on the destination site
- Enter the key on the source installation
- Start the transfer
The plugin then copies:
- WordPress core files
- Themes and plugins
- Uploads
- Database tables
During migration it also adjusts internal URLs automatically.
That part matters because WordPress stores URLs in several database locations, including serialized arrays. Manual replacements can corrupt serialized data if handled incorrectly.
Using Staging Before Major Updates
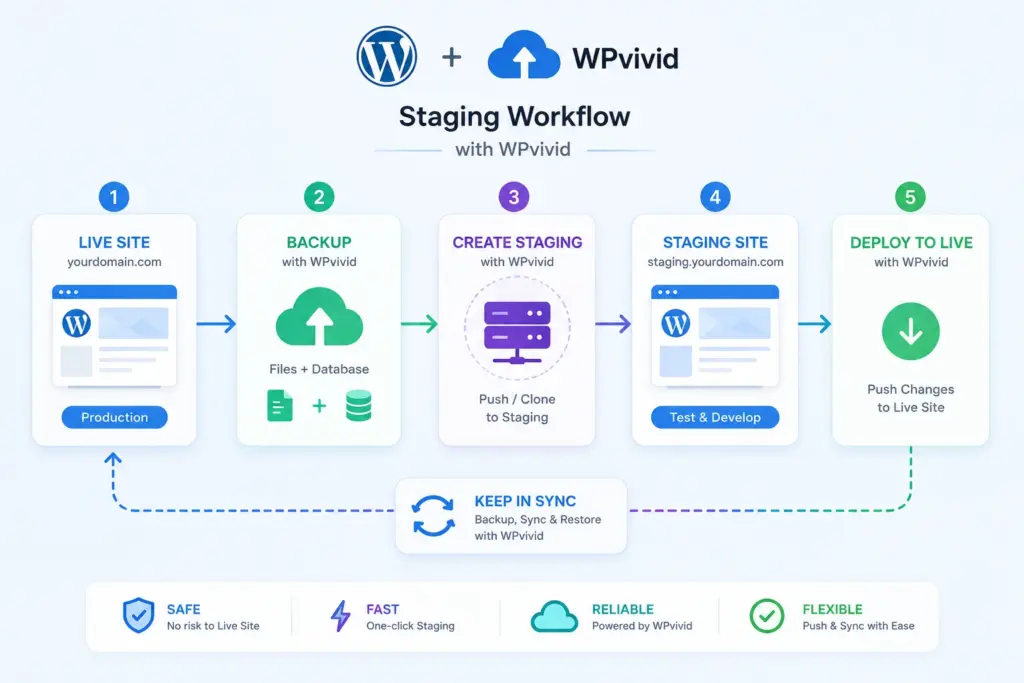
The staging functionality is useful when working on larger updates or plugin changes.
Instead of modifying the production environment directly, you can create a staging copy of the site and test changes there first.
Typical staging scenarios include:
- Updating WooCommerce
- Testing new plugins
- Switching themes
- Running PHP version upgrades
- Testing custom code
If something breaks, the live site remains unaffected.
For agencies or freelancers managing client sites, staging environments are often more important than backups themselves.
Compatibility and Performance Considerations
WPvivid works with most standard WordPress hosting environments, including shared hosting setups.
That said, there are a few things worth keeping in mind:
Large Sites
Sites with very large media libraries or backups above several gigabytes may run into hosting limitations. In those cases:
- Increase PHP memory limits if possible
- Use remote storage options
- Split backup tasks if needed
Server Restrictions
Some low-cost hosting providers restrict long-running PHP processes. Migration or backup tasks can fail if execution limits are too low.
In practice, this is not specific to WPvivid. Most WordPress backup plugins face the same limitation.
Plugin Conflicts
Backup and migration plugins occasionally conflict with aggressive security or caching plugins. If a migration behaves unexpectedly, temporarily disabling page caching can help.
Final Thoughts
WPvivid solves a very practical problem in WordPress development and site management. It removes much of the repetitive manual work involved in backups, migrations and staging workflows without requiring shell access or direct database handling.
For beginners, the biggest advantage is probably the automated URL handling during migrations. For developers and freelancers, staging support and quick site transfers are the more useful features.
It is not a replacement for a proper deployment pipeline on larger enterprise projects, but for most small and medium WordPress sites it covers the common migration and backup workflow reliably.